
COOL CUBE™ PCM MEDICAL COOLERS – VIDEOS & PDFs
Learn how to prepare your PCM panels for the best temperature duration and performance of your Cool Cube™ medical cooler. Select your PCM panel temperature to be taken to videos and preparation pdf document downloads.
COOL CUBE™ REFRIGERATOR PCM PREP – VIDEOS & PDFs
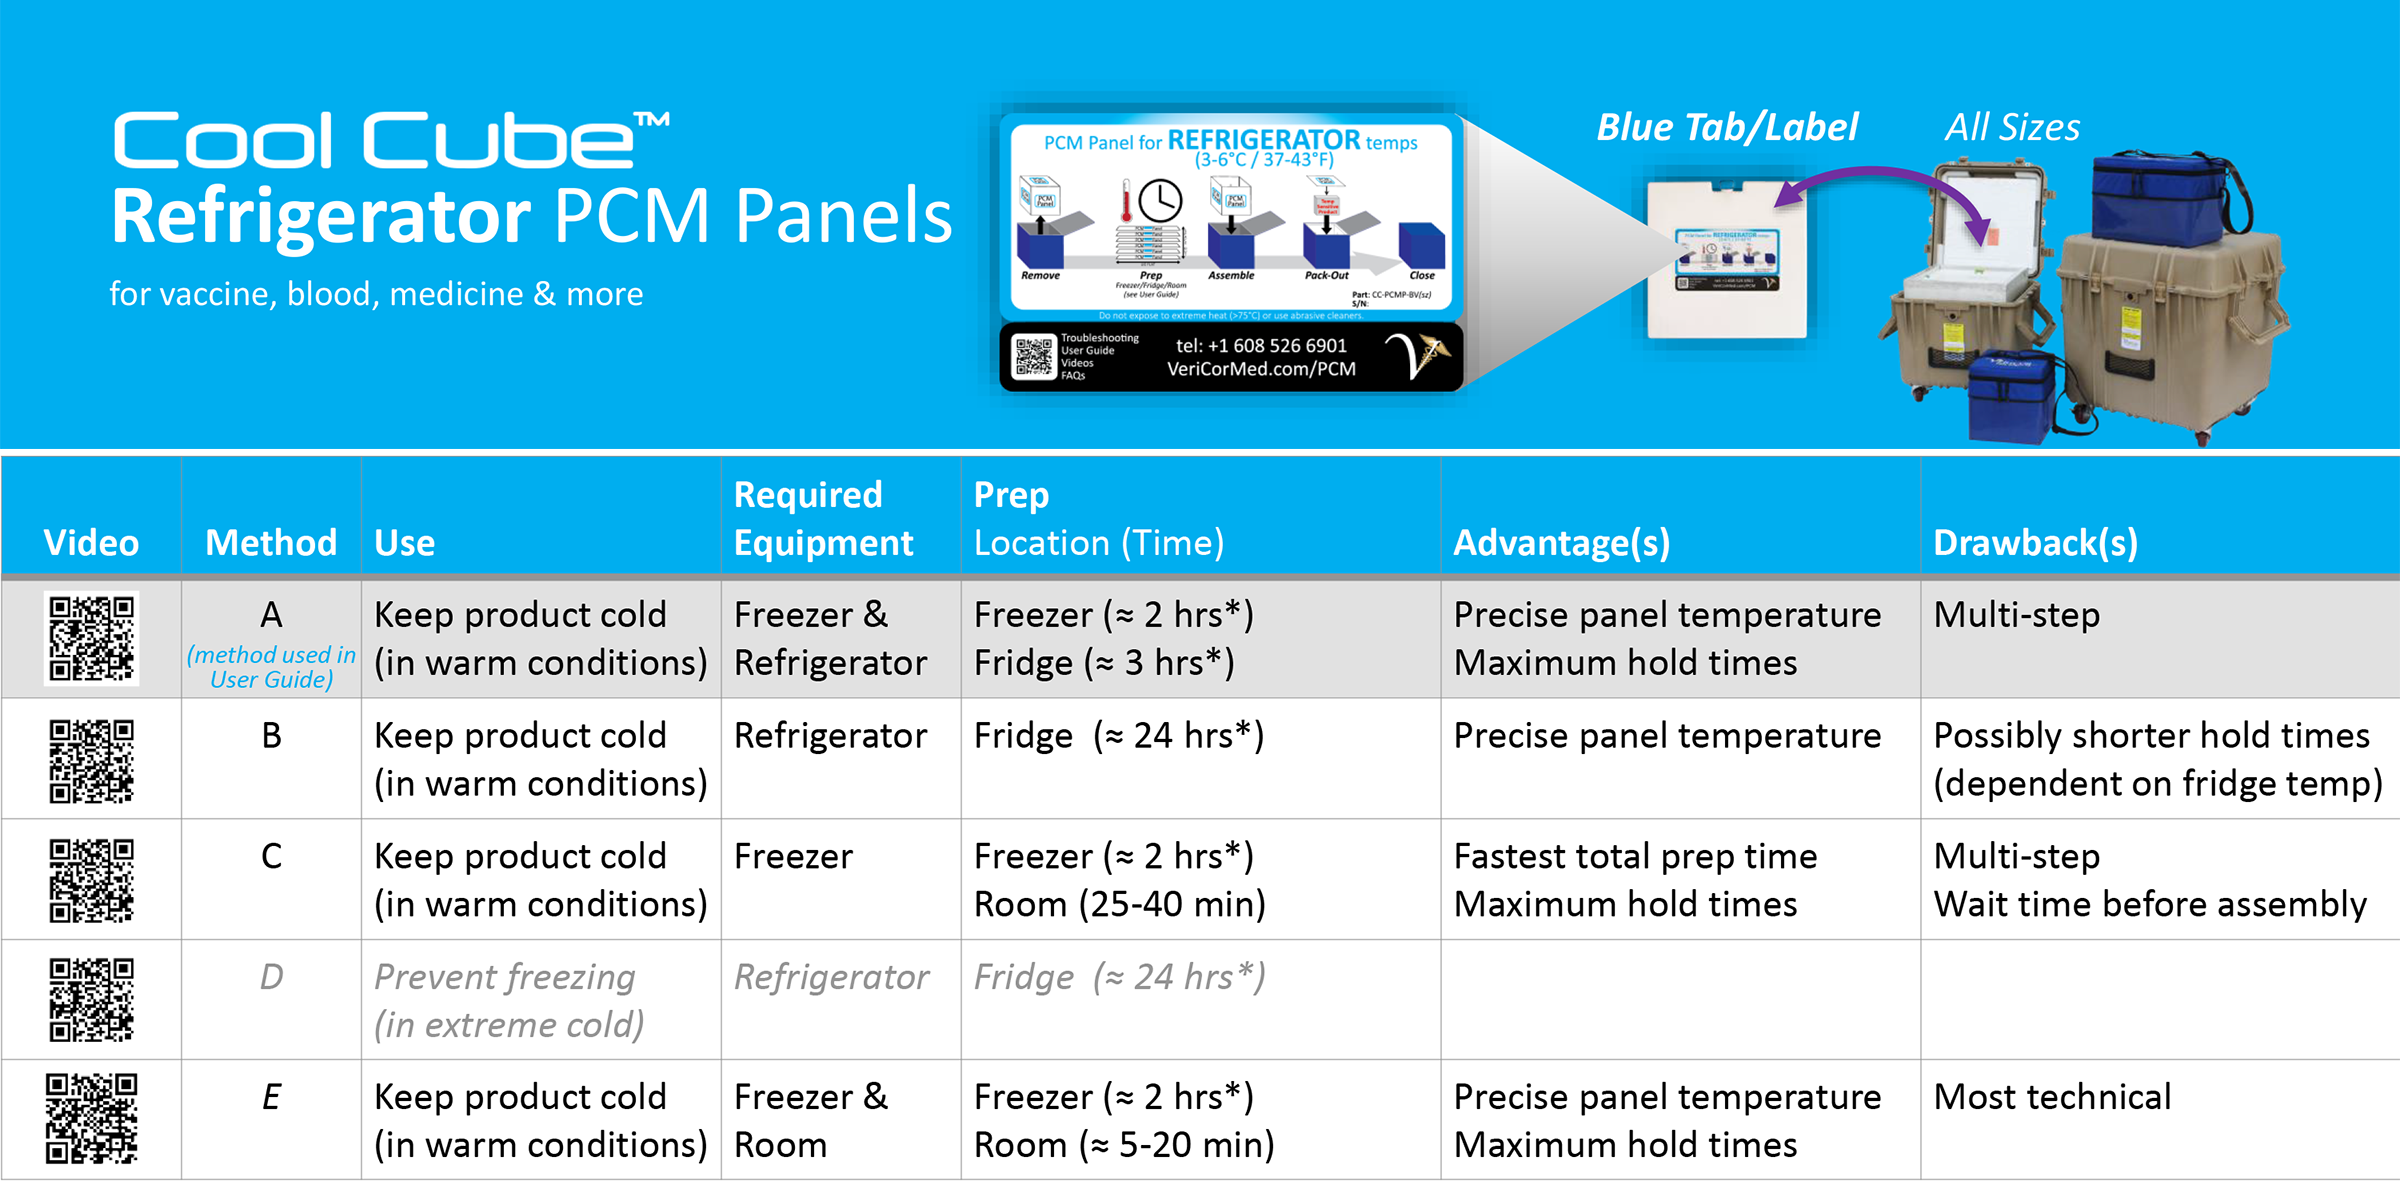
- *Panels may be stored at this stage indefinitely (for longer than indicated).

About Refrigerator Temps PCM (Phase Change Material)
PCM absorbs and releases thermal energy during the process of melting and freezing. When solid PCM melts, it absorbs the heat from the environment, yet its temperature stays at the melting point until totally liquid. Conversely, when liquid PCM freezes, it absorbs the cold from the environment yet stays at its temperature until totally solid. Therefore, PCM an ideal, passive solution for a variety of applications that require temperature control. The most common PCM is water, which has a melting point of 0 °C (32 °F). When solid, ice/water maintains a temperature of 0 °C until it turns completely liquid. So, in essence, the 0 °C melting point makes it unsafe for most refrigerated temperature sensitive applications.
Cool Cube™ Refrigerator Temps PCM has a melting point of 4.5 °C/40.1 °F. When the PCM is solid, a panel helps the Cool Cube ™stay cool (about 5 °C) in warm/hot environments. When the PCM is liquid, a panel helps the Cool Cube ™stay warm (about 4 °C) in freezing conditions. It’s right around that 4.5 °C/40.1 °F where a PCM panel’s temperature plateaus for a while during the warming up and/or cooling down processes.
Cool Cube™ Refrigerator PCM – Prep Introduction
Prep Method A – Keep product cold (in warm conditions)
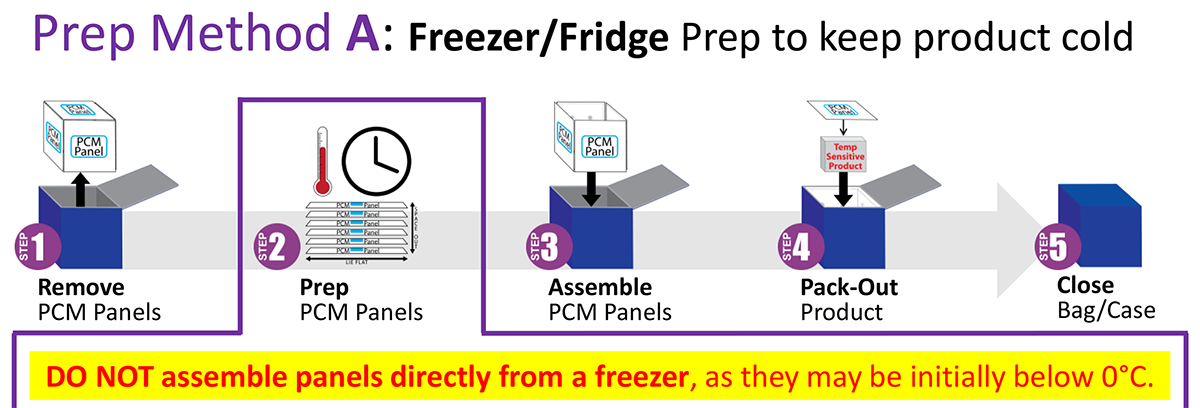
Refrigerator PCM Prep Method A: Freezer to Fridge Pack-Out Instructions
Panel Prep
2.1 Lay panels flat in a freezer until all the PCM (phase change material inside the panel) turns solid. At -15°C/5°F the PCM will solidify in a couple hours.
2.2 Transfer panels into a fridge at least 3 hours before use. Panels may be stored in the fridge until needed for assembly or until the PCM melts.*
- * If a fridge maintains 4°C/39°F or below, the PCM within the panels will not melt (melting point is 4.5°C/40°F), which will keep the panel solid indefinitely until pack-out. If the fridge maintains 5°C/41°F or above, periodically check for melting and restart at step 2.1 to ensure optimal performance.

2.3 Shake panels to verify the PCM is solid. If there is liquid, restart at step 2.1 to ensure the longest hold time. Using liquid PCM or panels with a solid/liquid combination decreases the hold time.
Prep Method B – Keep product cold (in warm conditions)
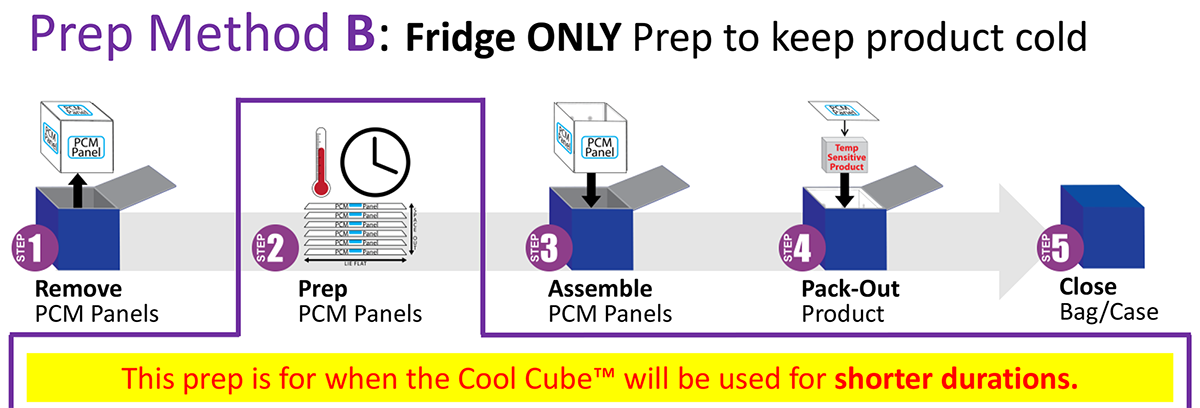
Refrigerator PCM Prep Method B: Fridge Only Pack-Out Instructions
Panel Prep
2.1 Lay panels flat in a refrigerator for a minimum of 24 hours before use.
2.2 Shake panels to check the state of the PCM (phase change material inside the panel).
- If liquid…panel is at the fridge temp but above 5°C; anticipate shorter hold times.
- If solid…panel is at the fridge temp but below 4°C; ideal for maximum hold times.
- If solid/liquid combination…panel is at the fridge temp of 4-5°C; monitor time/temp.
In a refrigerator that maintains 4°C or below, the PCM will be solid (ideal for keeping product cold in warm/hot conditions). In a refrigerator that maintains 5°C or above, the PCM will be liquid. Although the PCM is liquid, the panel is at the temperature of the storage environment after 3 hours (i.e., stored in a 6°C fridge, the panels are at 6°C). Assembling the Cool Cube™ with liquid PCM panels (additional thermal mass) will help keep the product at its temperature, just for a shorter amount of time. Monitor Cool Cube™ temperature closely.
Prep Method C – Keep product cold (in warm conditions)
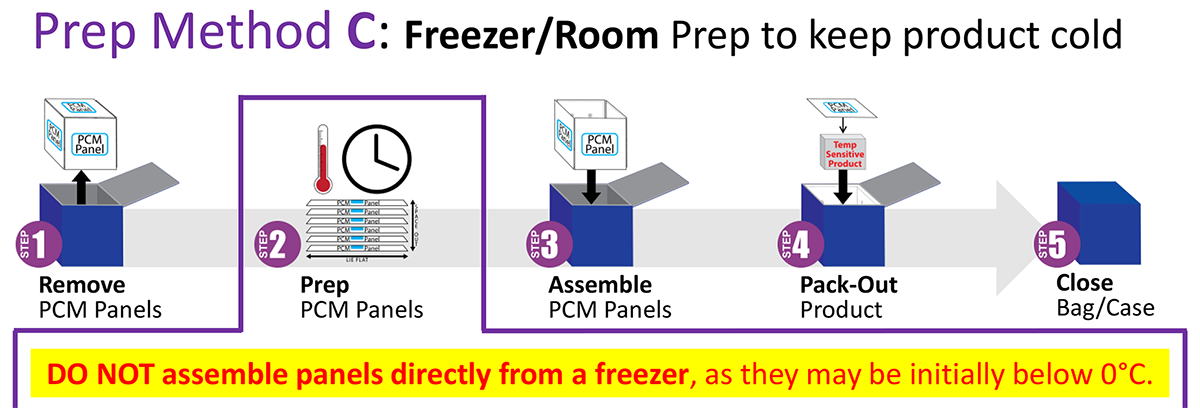
Refrigerator PCM Prep Method C: Freezer to Room Pack-Out Instructions
Panel Prep
2.1 Lay panels flat in a freezer until all the PCM (phase change material inside the panel) turns solid. At -15°C/5°F the PCM will solidify in a couple hours.
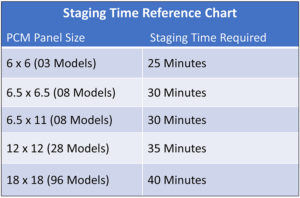
2.2 Transfer panels into a room temperature environment just before use to allow the PCM inside to rise to the appropriate operating temperature. Approximate times:
- “03” size = 25 minutes
- “08” size = 30 minutes
- “28” size = 35 minutes
- “96” size = 40 minutes
- **Times based on a 22°C/72°F room.
2.3 Wipe off condensate. After frost turns to condensate, the panel is above 0°C.
2.4 Shake panels to verify the PCM is solid. If a little liquid is heard, it is at 4.5°C. If there is a lot of liquid, restart at step 2.1 to ensure the longest hold time. Using liquid PCM or panels with a solid/liquid combination decreases the hold time.
Refrigerator PCM Prep Method D – Prevent freezing (in extreme cold)
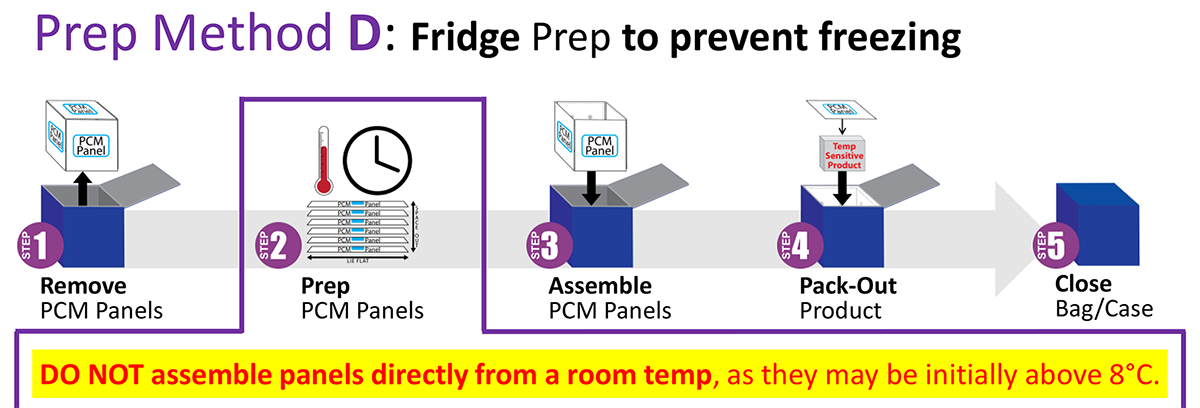
Refrigerator PCM Prep Method D: Fridge Only Pack-Out Instructions (to prevent freezing)
Panel Prep
2.1 Place panels in a fridge between 5° and 8°C for at least 24 hours before use so the PCM (phase change material inside the panel) is liquid.*
- * Panels may be stored in the fridge until needed for assembly or the PCM solidifies. If a refrigerator maintains 5°C or above, the PCM within the panels will not get solid (the solidifying point is 4.5°C), keeping the PCM liquid indefinitely until pack-out. Liquid PCM panels will protect the product from freezing until the PCM becomes completely solid.
2.2 Shake panels to verify the PCM is liquid. If solid, restart at step 2.1 to ensure the longest hold time. Liquid PCM will prevent the product from freezing (at refrigerator temps) in extreme cold the longest. Using solid PCM or panels with a solid/liquid combination decreases the hold time.
Prep Method E – Keep product cold (in warm conditions)
* Freezer/Room Prep to maintain 1-6°C
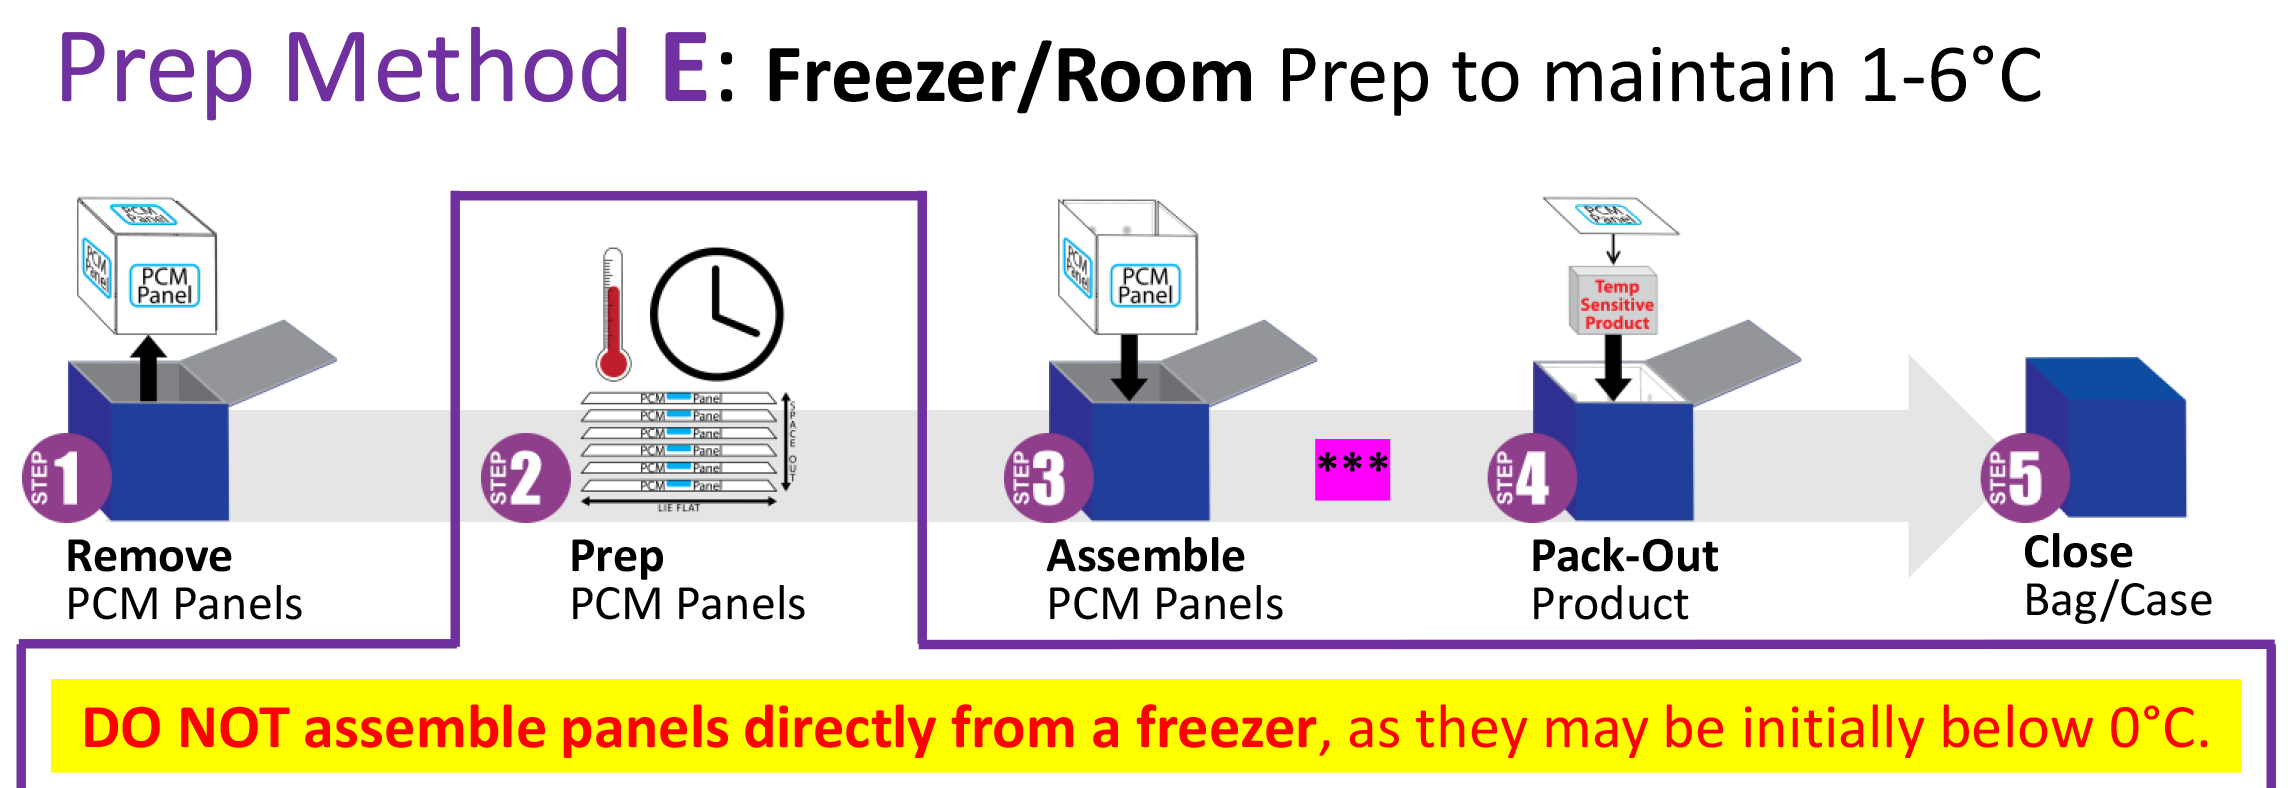
Refrigerator PCM Prep Method D: Fridge Only Pack-Out Instructions (to prevent freezing)
Panel Prep
2.1 Lay panels flat in a freezer until all the PCM (phase change material inside the panel) turns solid. At -15°C/5°F the PCM will solidify in a couple hours.
2.2 Transfer panels into a room temperature environment just before use to allow the PCM inside to rise to the optimal 1°C. Approximate times:
“03” size = 5 minutes
“08” size = 10 minutes
“28” size = 15 minutes
“96” size = 20 minutes

2.3 Wipe off condensate & shake.After frost turns to condensate, the panel is above 0°C. Shake panels to verify that the PCM is completely solid. If liquid is heard, re-freeze (Step 2.1) and proceed. Using liquid PCM decreases the hold time considerably.

After Step 3 (before pack-out), insert a thermometer and close to monitor when the Cool Cube™ gets to the 1°C mark. If below the 1°C mark, wait until it warms up to 1°C before packing out. To speed up the process, transfer panels into a room temperature environment for a couple of minutes and re-check. Pack-out at 1°C will ensure a maximum hold time between 1° and 6°C.
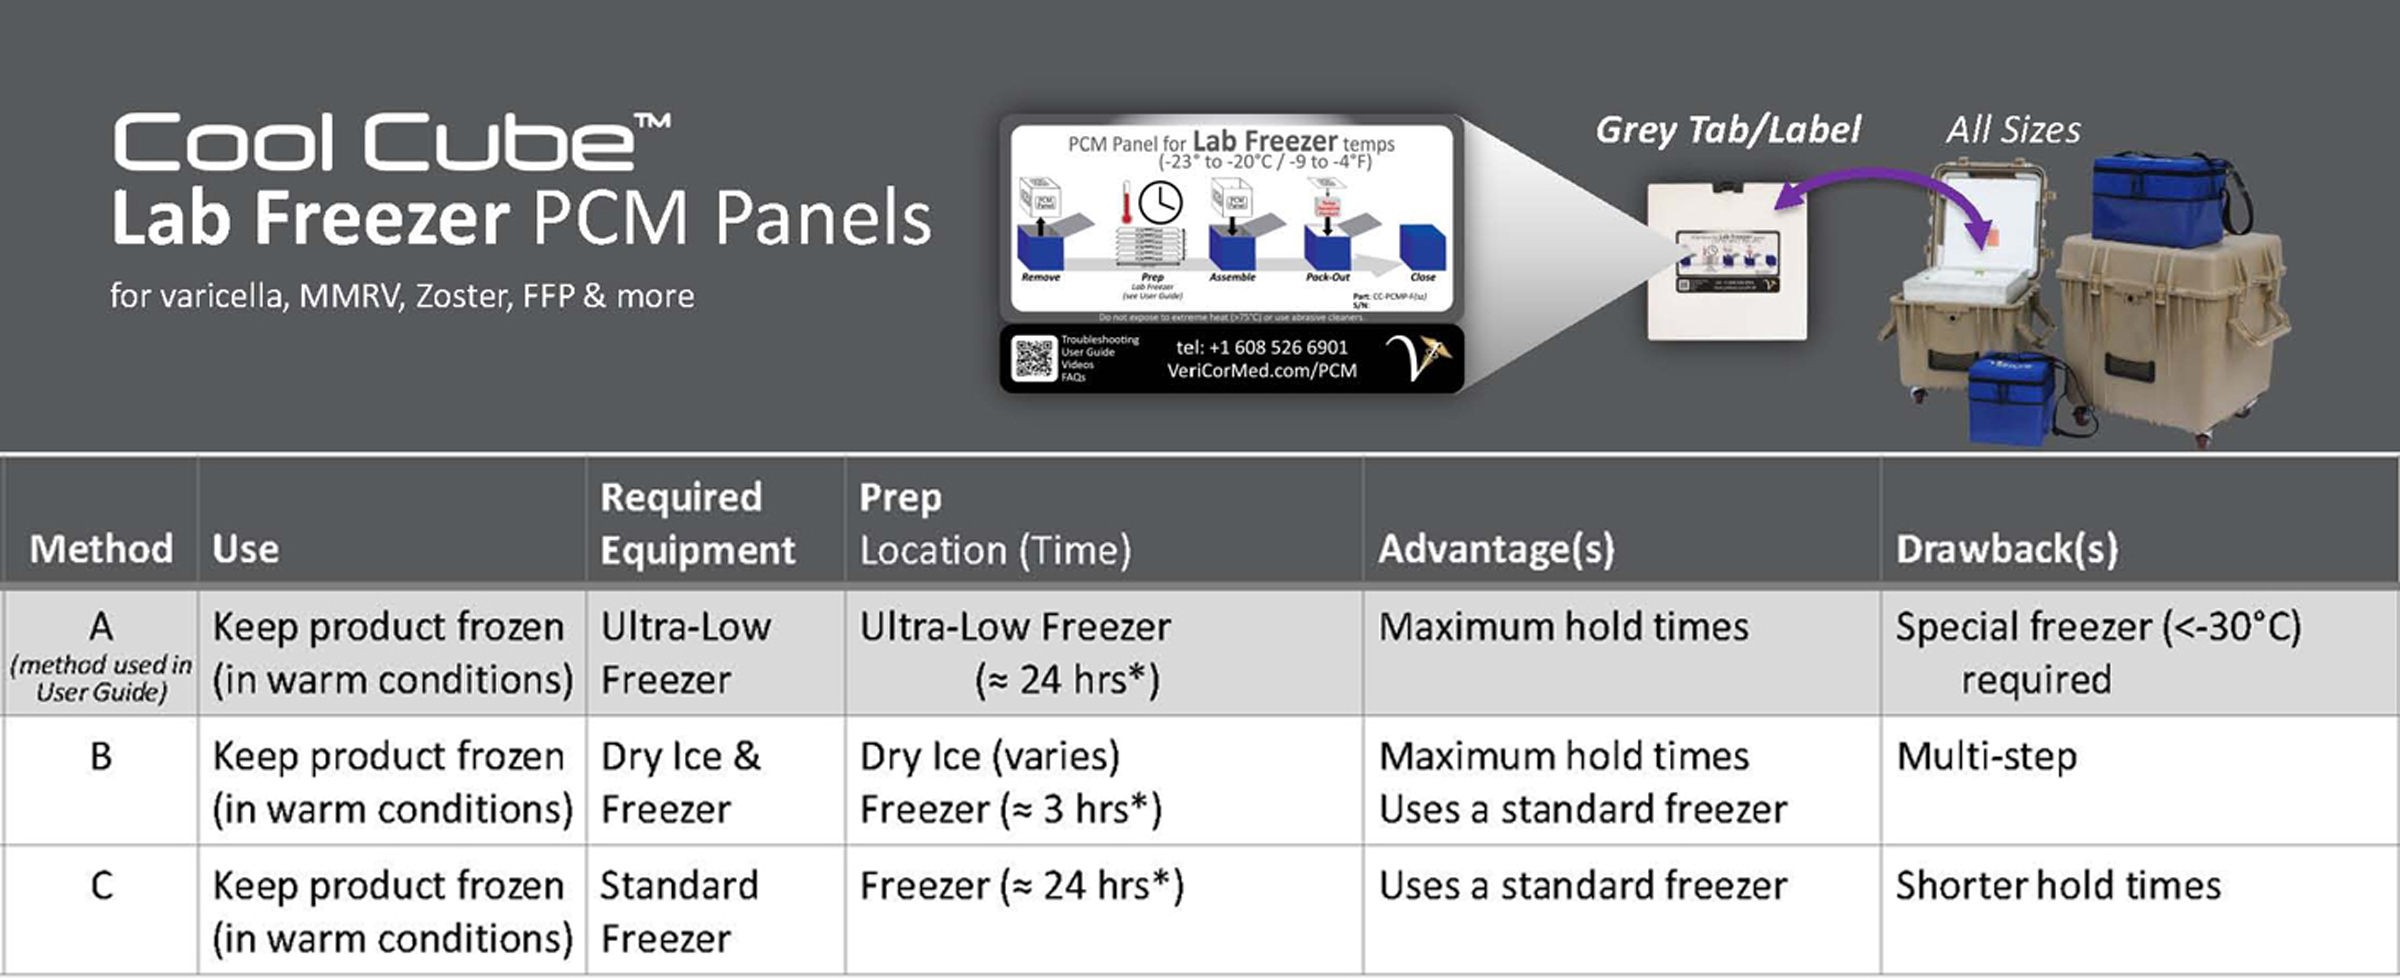
COOL CUBE™ LAB FREEZER PCM PREP – VIDEOS & PDFs
- *Panels may be stored at this stage indefinitely (for longer than indicated).

About Lab Freezer PCM (Phase Change Material)
PCM absorbs and releases thermal energy during the process of melting and freezing. When solid PCM melts, it absorbs the heat from the environment, yet its temperature stays at the melting point until totally liquid. Conversely, when liquid PCM freezes, it absorbs the cold from the environment yet stays at its temperature until totally solid. Therefore, PCM an ideal, passive solution for a variety of applications that require temperature control. The most common PCM is water, which has a melting point of 0°C (32°F). When solid, ice/water maintains a temperature of 0°C until it turns completely liquid. So, in essence, the 0°C melting point makes it unsafe for most frozen temperature-sensitive applications.
Cool Cube™ Lab Freezer Temps PCM has a melting point of -21.5°C/-6.7°F. When the PCM is solid, a panel helps the Cool Cube™ stay cool (about -21°C) in warm/hot environments. It’s right around that -21.5°C/-6.7°F where a PCM panel’s temperature plateaus for a while during the warming up and/or cooling down processes.
Cool Cube™ Lab Freezer – Prep Introduction
Prep Method A – Ultra-low freezer
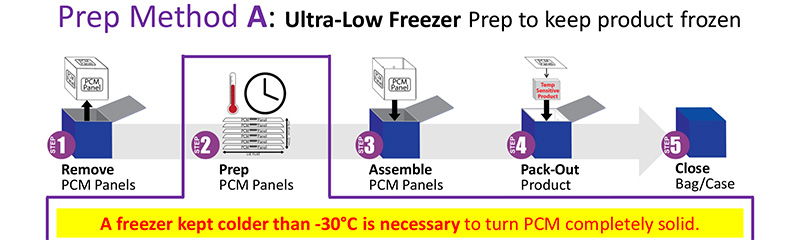
Prep Method A: Ultra-Low Freezer Prep to keep product frozen
Panel Prep
2.1 Lay panels flat in an ultra-low freezer until all the PCM (phase change material inside the panel) turns solid. At -30°C/-22°F the PCM will solidify in a day or two.*
- * If the freezer temperature is ever warmer than -30°C, PCM may not get completely solid (due to the possibility of supercooling). If panels are stored within the temperature parameters of the product but the PCM is liquid, panels may be used but the hold time will decrease.
2.2 Shake panels to verify the PCM is solid. If there is liquid, restart at step 2.1 to ensure the longest hold time. Using liquid PCM or panels with a solid/liquid combination decreases the hold time.
Prep Method B – Dry ice
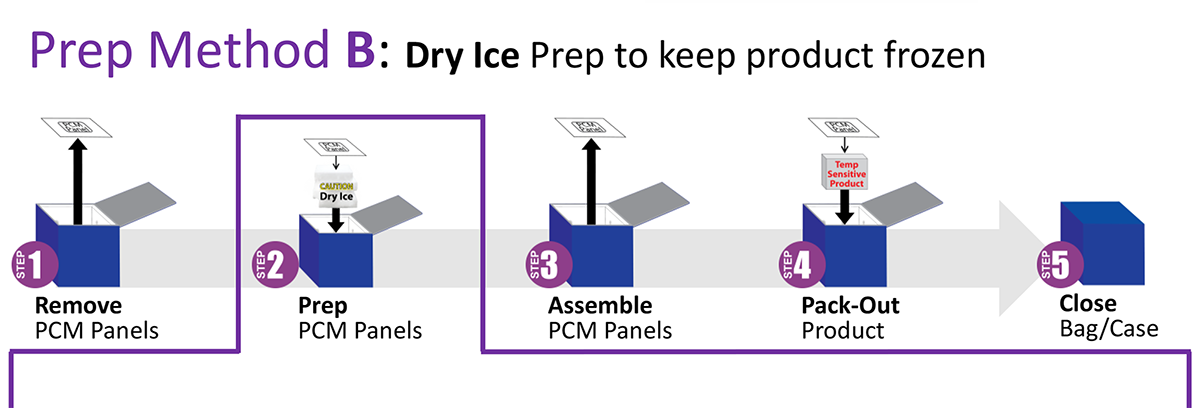
Prep Method B: Dry Ice Prep to keep product frozen
Panel Prep
2.1 Pack out cooler with dry ice until the PCM (phase change material inside the panel) panels become solid. The more dry ice, the faster the PCM will solidify.*
- * Time varies dependent on the starting temperature of the panels, size of panels, and amount of dry ice used. CAUTION: Dry ice has a surface temperature of -78.5°C/-109.3°F, so handle with care.
2.2 (Optional) If product to be packed out cannot withstand an initial -70°C temperature, transfer panels into a standard freezer at least 3 hours before use. Panels may be stored in the freezer until needed for assembly or the PCM melts.
If a freezer maintains -23°C or below, the PCM within the panels will not melt (melting point is -21.5°C), keeping the PCM solid indefinitely until pack-out. If the freezer maintains -21.5°C or above, periodically check for melting and restart at step 2.1 to ensure the longest hold time.
2.3 Shake panels to verify the PCM is solid. If there is liquid, restart at step 2.1 to ensure the longest hold time. Using liquid PCM or panels with a solid/liquid combination decreases the hold time.
Prep Method C – No access to Ultra-low freezer (short term use)
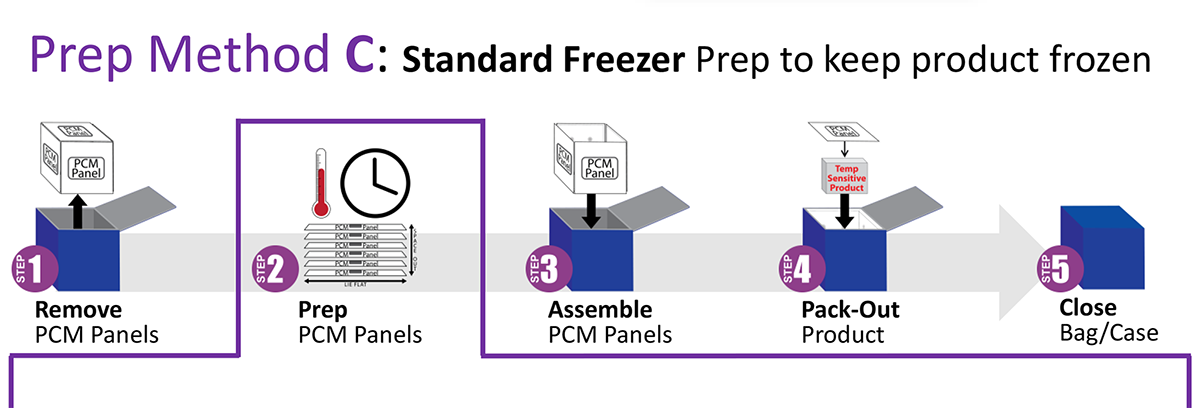
Prep Method C: Standard Freezer Prep to keep product frozen
Panel Prep
Store panels in a standard freezer (turned down to its lowest setting) for a minimum of 24 hours before use. Unless the freezer is always below -23°C, the PCM (phase change material inside the panel) will never turn completely solid, but short-term use is still possible.*
- * Although PCM is liquid, it is at the temperature of storage environment after 3 hours. For instance, panels stored in a -18°C freezer are at -18°C even PCM is liquid. Assembling the Cool Cube™ with this additional thermal mass will keep product frozen, just for a shorter amount of time than the lab-validated results.
Shake panels to check the state of the PCM (phase change material inside the panel).
- If liquid…panel is at the freezer temp but above -20°C; anticipate shorter hold times.
- If solid…panel is at the freezer temp but below -23°C; ideal for maximum hold times.
- If solid/liquid combination…panel is at the freezer temp between -23 and -20°C; monitor longer use periods.
COOL CUBE™ ROOM TEMP PCM PREP – VIDEOS & PDFs
- *Panels may be stored at this stage indefinitely (for longer than indicated).

About Room Temps PCM (Phase Change Material)
PCM absorbs and releases thermal energy during the process of melting and freezing. When solid PCM melts, it absorbs the heat from the environment, yet its temperature stays at the melting point until totally liquid. Conversely, when liquid PCM freezes, it absorbs the cold from the environment yet stays at its temperature until totally solid. Therefore, PCM is an ideal, passive solution for a variety of applications that require temperature control. The most common PCM is water, which has a melting point of 0°C (32°F). When solid, ice/water maintains a temperature of 0°C until it turns completely liquid. So, in essence, the 0°C melting point makes it unsafe for most temperature-sensitive applications.
Cool Cube™ Room Temps PCM has a melting point of 21.5°C/70.7°F. When the PCM is solid, a panel helps the Cool Cube™ stay cool (about 22°C) in hot environments. When the PCM is liquid, a panel helps the Cool Cube™ stay warm (about 21°C) in cold conditions. It’s right around that 21.5°C/70.7°F where a PCM panel’s temperature plateaus for a while during the warming up and/or cooling down processes.
Cool Cube™ Room Temps – Prep Introduction
Prep Method A – Lab incubator (prevent warming)
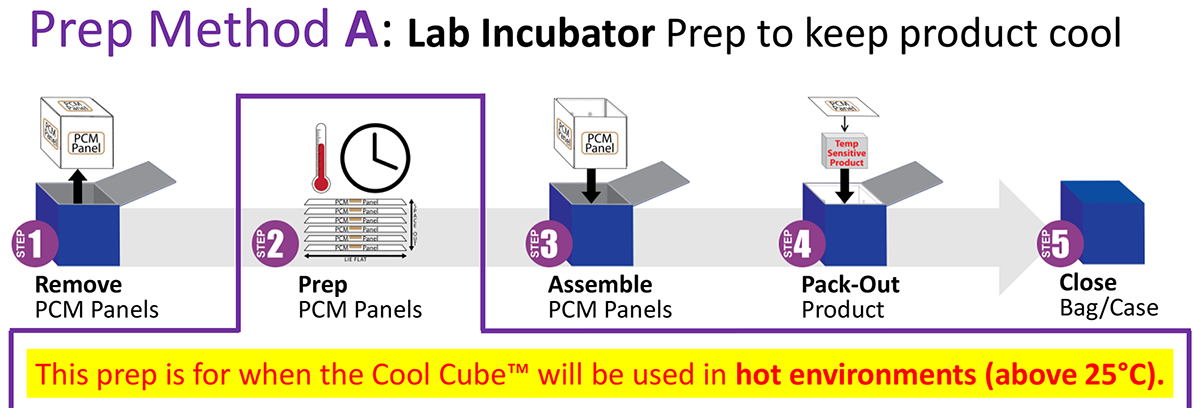
Prep Method A: Lab Incubator Prep to keep product cool
Panel Prep
2.1 Lay panels flat in a lab incubator (or other 15-20°C environment) until all the PCM (phase change material inside the panel) turns solid. At 15°C/59°F the PCM will solidify in a day or two.*
- * If the incubator temperature is ever warmer than 20°C, panels may not get completely solid (manufacturing tolerances). If stored within the temperature parameters of the product, but are still liquid, panels may be used but the hold time will decrease. Although panels are liquid, the PCM inside is at the temperature of storage environment after 3 hours (i.e. stored in a 22°C incubator, the PCM panels are at 22°C). Assembling the Cool Cube™ with this additional thermal mass will keep product at room temperature, just for a shorter amount of time than the lab-validated results.
2.2 Shake panels to verify the PCM is solid. If there is liquid, restart at step 2.1 to ensure the longest hold time. Using liquid PCM or panels with a solid/liquid combination decreases the hold time.
Prep Method B – Refrigerator (prevent warming)
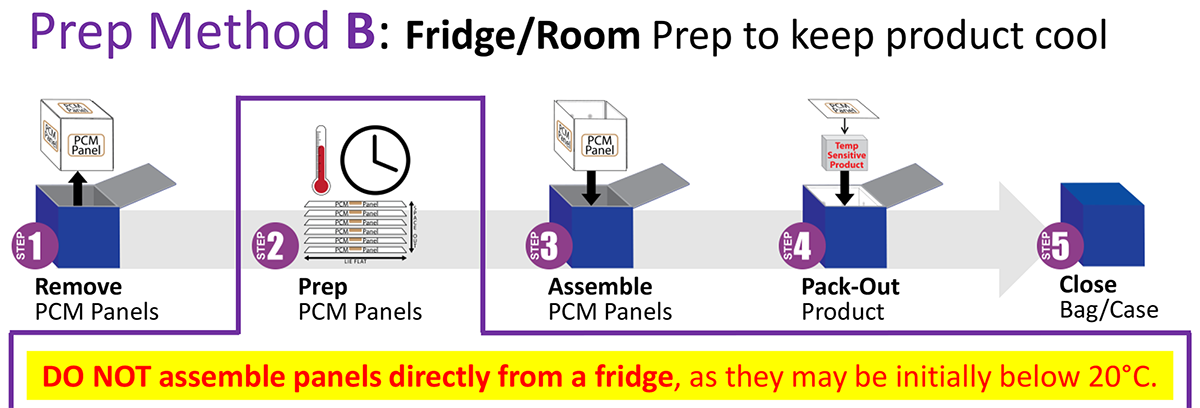
Prep Method B: Fridge/Room Prep to keep product cool
Panel Prep
2.1 Lay panels flat in a refrigerator until all the PCM (phase change material inside the panel) turns solid. At 4°C/39°F the PCM will solidify in a couple hours.
2.2 Spread panels out (enable airflow to all sides) in a room just before use to allow the PCM inside to rise to the appropriate operating temperature. Approximate times:
- “03” size = 35 minutes
- “08” size = 40 minutes
- “28” size = 45 minutes
- “96” size = 50 minutes
- **Times based on a 22°C/72°F room.
2.3 Shake panels to verify the PCM is solid with just a little liquid. If a little liquid is heard, it is at 21.5°C. If there is a lot of liquid, restart at step 2.1 to ensure the longest hold time. Using liquid PCM or panels with a solid/liquid combination decreases the hold time. Wipe off condensate and proceed with assembly.
Prep Method C – Lab incubator (prevent cooling)
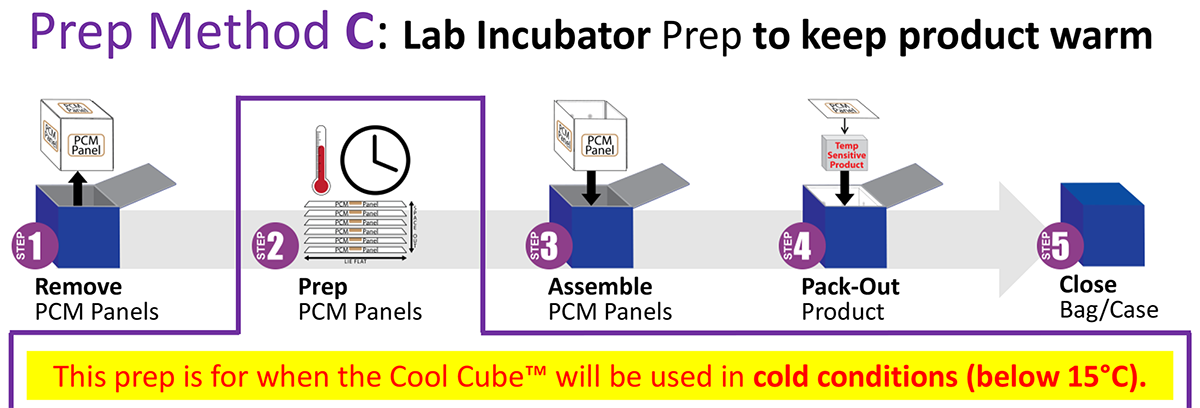
Prep Method C: Lab Incubator Prep to keep product warm
Panel Prep
2.1 Place panels in a lab incubator 23-24°C for at least 24 hours before use so the PCM (phase change material inside the panel) is liquid.*
- * Panels may be stored in the fridge until needed for assembly or the PCM solidifies. If an incubator maintains 23°C or above, the PCM within the panels will not get solid (the solidifying point is 21.5°C), keeping the PCM liquid indefinitely until pack-out. Liquid panels will protect the product from getting cold until the PCM inside becomes completely solid.
2.2 Shake panels to verify the PCM is liquid. If they are solid, restart at step 2.1 to
ensure the longest hold time. Liquid PCM panels will prevent the product from getting cold (at room temps) in a cold environment the longest. Using solid PCM or panels with a solid/liquid combination decreases the hold time.
Prep Method D – Room temperature (prevent cooling)

Prep Method D: Room Prep to keep product warm
Panel Prep
2.1 Place panels in a room between 23-24°C for at least 24 hours before use so the PCM (phase change material inside the panel) is liquid.*
- * Panels may be stored in a room until needed for assembly or the PCM solidifies. If a room maintains 23°C or above, the PCM within the panels will not get solid (the solidifying point is 21.5°C), keeping the PCM liquid indefinitely until pack-out. Liquid panels will protect the product from getting cold until the PCM inside becomes completely solid.
2.2 Shake panels to verify the PCM is liquid. If they are solid, restart at step 2.1 to ensure the longest hold time. Liquid PCM panels will prevent the product from getting cold (at room temps) in a cold environment the longest. Using solid PCM or panels with a solid/liquid combination decreases the hold time.
USING A CORDED TEMPERATURE MONITOR
WITH THE COOL CUBE™
Routing a Corded Probe through the Cool Cube™ 03
The Cool Cube™ 03 has clear plastic, external pockets for holding a temperature monitor (or other things) during use. When using a device with a corded probe, here’s how you can do it:
- After packing out the product, place the probe within the chamber as if it were the product.
- Route the cord to a corner of the Cool Cube™, where the panels meet.
- Place the last PCM panel on top to complete the chamber.
- Close the lid of the Cool Cube™
- Zip the two zippers around the cord where it comes out
- Plug the cord into the temperature monitor and place it in a pocket of the Cool Cube™.
**Best Practice: Condition the probe to the target temperature before integrating it into the Cool Cube™ chamber.
Routing a Corded Probe through the Cool Cube™ 08
The Cool Cube™ 08 has clear plastic, external pockets for holding a temperature monitor (or other things) during use. When using a device with a corded probe, here’s how you can do it:
- After packing out the product, place the probe within the chamber as if it were the product.
- Route the cord to a corner of the Cool Cube™, where the panels meet.
- Place the last PCM panel on top to complete the chamber.
- Close the lid of the Cool Cube™
- Zip the two zippers around the cord where it comes out
- Plug the cord into the temperature monitor and place it in a pocket of the Cool Cube™.
**Best Practice: Condition the probe to the target temperature before integrating it into the Cool Cube™ chamber.
Routing a Corded Probe through the Cool Cube™ 28
The Cool Cube™ 28 is equipped with an elastic, external pocket to hold a temperature monitor (or other things) during use. When using a device with a corded probe, here’s how you can do it:
- After packing out the product, place the probe in the chamber with the product.
- Next, route the cord to the center, front of the Cool Cube™. (If you have not disconnected the cord from the device, do so now.)
- Take the plug end of the cord and slide it down between the insulation panel and outer wall of the case about 3” to the black flexible grommet.
- Push the plug end of the cord through the flexible grommet (from the inside out).
- The design allows for the grommet to be removed or possibly popped out during this process. Route the cord through the grommet and re-insert if necessary.
- Place the last PCM panel on top to complete the chamber.
- Plug the cord into the temperature monitor and place it in the pocket of the Cool Cube™.
- Close the lid of the Cool Cube™.
One moment of caution here. Routing a cord through the open lid and not utilizing the grommet hole will likely inhibit the lid from closing completely and could damage or sever the cord when closing the lid.
**Best Practice: Condition the probe to the target temperature before integrating it into the Cool Cube™ chamber.
Routing a Corded Probe through the Cool Cube™96
The Cool Cube™ 96 is equipped with an elastic, external pocket to hold a temperature monitor (or other things) during use. When using a device with a corded probe, here’s how you can do it:
- Slide out the front PCM panel being careful not to disturb the product arrangement.**Be cautious of rings/jewelry on this next step.**
- Place the probe within the chamber as if it were the product. Route the cord to the center, front of the Cool Cube™. (If you have not disconnected the cord from the device, do so now.)
- Slide a hand between the outer case and front Styrofoam insulation to create about 1” of space, the front vacuum insulated panel will flex slightly.
- Take the plug end of the cord and slide it down between the foam and outer wall of the case about 2” to the black flexible grommet.
- The design allows for the grommet to be removed or possibly popped out during this process. Route the cord through the grommet and re-insert if necessary.
- Push the plug end of the cord through the flexible grommet, from the inside out.
- Replace the front PCM panel and place the final panel on top to complete the chamber.
- Plug the cord into the temperature monitor and place it in the pocket of the Cool Cube™.
- Close the lid of the Cool Cube™.
One moment of caution here. Routing a cord through the open lid and not utilizing the grommet hole will likely inhibit the lid from closing completely and could damage or sever the cord when closing the lid.
**Best Practice: Condition the probe to the target temperature before integrating it into the Cool Cube™ chamber.

You must be logged in to post a comment.